How to use Jaeger's bizarre TV setup
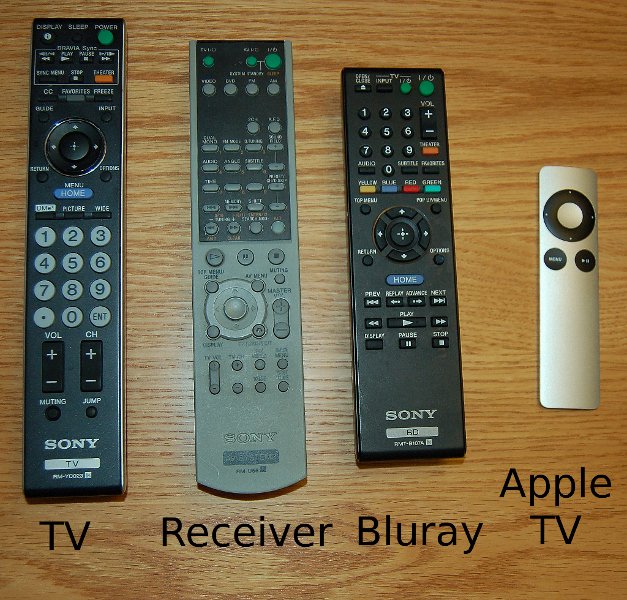
This setup isn't really all that bizarre, but I confess I use it less than I used to, what with the dawn of the Calvin Era. Here are the remotes you might need:
These remotes generally live in the top drawer in the entertainment cabinet, although sometimes the cats (or their humans) hide them in the couch.
Note that this information is current for Megafest 12.1.
TV
The centerpiece of the AV system is a 40-inch 1080p LCD (Sony KDL-40V4100, if you're curious). It features two inputs on the left side of the screen (one HDMI and one analog composite video input), which may be selected by pressing the "Input" or "Home" buttons on the remote and navigating to the appropriate input. Several inputs are hard-wired to the TV:
- HDMI 1: Blu-Ray player
- HDMI 2: Side-panel HDMI, useful for plugging in computers and other devices
- HDMI 3: Apple TV
- PC:
Sasami
Selecting video inputs on the TV will route the appropriate audio to the optical toslink input on the receiver. You should be able to find an HDMI cable long enough to stretch from the tv to the couch that you can plug your HDMI-capable portable computing device into HDMI 2.
Blu-Ray Player
New as of May 2010 is a Blu-Ray player, available as input "HDMI 1" on the TV. The full capabilities of this networked device have not yet been examined in detail.
Mac mini
Sasami stopped booting in the spring of 2013 but is still connected, albeit powered off, to input "PC" on the TV. This input could be claimed for a VGA input, if anyone's into that sort of thing any more.
Apple TV
We don't really have a compelling use-case for the Apple TV, but it'll play YouTube and WSJ Live. iPad2+ on our network should be able to use AirPlay to mirror the iPad.
Receiver
This surround sound receiver came into my life through my former employer, which paid my vacation pay in surplus hardware instead of cash. After moving I've been too lazy to plug in the rear speakers, so we have only the three front speakers, plus the subwoofer, plugged into the receiver.
Aside from the volume (which is easy to find), the receiver is pretty much set up in "do what I mean" mode. When the TV is on (and the input selection is "Video", which should be the default), the receiver plays audio from whichever input is selected on the TV. (Dolby Digital pass-through seems to work properly, which pleases me.) When the TV is off, the receiver will play audio from Sasami, providing direct access to iTunes and any CDs one wishes to play.
If you don't want to wake whoever is sleeping on the couch, plug your headphones into the 1/4" jack on the front panel of the receiver, which has a 1/8" adapter. There are several 1/8" extensions floating around the living room; look in the top drawer. When headphones are plugged into the jack, the speakers are disabled.
If the receiver does not play audio, press these buttons to restore proper settings:
- "Video"
- "Input". This will toggle between three settings: "optical" (pass-through from the television), "analog" (direct from the DVD player), and "auto" (switch between the two). "auto" is the preferred setting but "optical" will work in a pinch.
Bluetooth headphones
The TV features a Sony HWS-BTA2W Bluetooth wireless audio adapter plugged into the analog audio output, which is paired with a pair of Motorola wireless Bluetooth stereo headphones. This arrangement usually works, though it might drop out for a few seconds at the least-opportune moment.
- Mute the receiver, using the remote control.
- Turn on the Bluetooth transmitter by pressing the button on the top of the transmitter and holding for a second or two, until the green power LED lights.
- Turn on the Bluetooth headphones by pressing and holding the button on the outside of the left earpiece with a phone icon, until the blue LED surrounding the button lights.
- Wait five to ten seconds for the headphones to connect to the transmitter. The blue LED on the front of the transmitter marked with a Bluetooth icon will turn on, and you'll hear audio through the headphones.
- Adjust the volume by twisting the outer ring of the left earpiece, faintly labeled with a "+" in the counter-clockwise direction to increase the volume and a "-" in the clockwise direction to decrease the volume. (The controls on the right earpiece allows the headphones to send AVRCP commands to the Bluetooth host, which my transmitter will not understand.)
- When you're done, press and hold the power button (labeled with a phone icon) on the headphones until the blue LED illuminates and fades. The Bluetooth transmitter will turn itself off automatically.
The headphones require occasional feeding using a USB mini jack.
